Tuesday, November 13, 2007
Beach Mama's Craft Corner!
Sorry I've been MIA for so long! I promise not to neglect you any more!
More soon!
xo
Beach Mama
Thursday, October 4, 2007
No Thrift Store Thursday...
But, first things first!
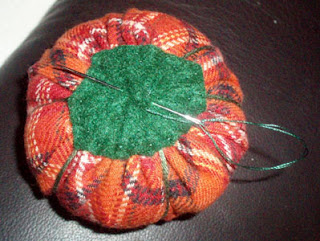
HOW TO MAKE YOUR OWN FABRIC PUMPKIN!!!

- Fabric (any type will do - but not felt)
- Embroidery Needle
- Sheers
- Pen
- Embroidery Floss
- Batting/ Stuffing
- Felt
- Something round (Plate, bowl, etc...)

Place your round object on your fabric
Trace & Cut

Thread your needle with a long length of embroidery floss.
Fold over the raw edge of your circle &
sew and running stitch all the way around your fabric circle edge.

Pull the thread ends together slightly to gather the circle edges up forming a bowl.

Stuff with batting. Use more for a firmer pumpkin, less for a squishy pillow.

Pull the threads taut & tie closed securing with a double knot.

Thread your needle with a REALLY LONG length of embroidery floss (at least 3 feet)
Knot the end of your floss and thread needle through puckered opening.
Push all the way through pumpkin to the center bottom.
Pull thread all they way through.
Pull thread around pumpkin, over the top and back around to the bottom.

Push needle through bottom to top opening.

Keep feeding needle from bottom to top creating the pumpkin segments.

You will make 8 segments in your pumpkin.
 Pull thread through top opening and tie off thread by securing to fabric edge and knotting off.
 Cut a piece of felt large enough to fully cover puckered opening.

The felt should be larger than the puckered opening
and when secured, felt to the fabric,
you will want to have loose "extra" felt in the middle for the stem.
 Knot off your thread but don't cut it yet.
Instead, thread needle under felt towards middle of felt top.
You will need to repeat this about 5-6 times to get a nice little stem.

Vintage glass ornaments! Woo-hoo!
'tis the season at the thrift stores!!!
Ciao for now!
Wednesday, October 3, 2007
Pumpkins Anyone?
First, I want to show you the hankies I embellished...
 I stitched an Erma Bombeck quote: "Humor is a spontaneous, wonderful bit of an outburst that just comes. It's unbridled, it's unplanned, it's full of surprises." It will be available in my Etsy shop
  Then I made one for me with my monogram and some SEASHELLS!
  After that, the halloween fabric was on SALE! So you KNOW I couldn't resist. I made a shimmery spiderweb cloth with 1 yard of sheer fabric and a 1/2 yard of cotton. Then I added a plaid grosgrain ribbon at the hem. LOVE IT!

And now for the PUMPKINS!!!!!!
 These will all be for sale in my etsy shop and tomorrow I'll show you how to make your very own! No Pattern - this is all from my own brain & hands.


They are so easy to make and you don't need a sewing machine! You'll get addicted!
The little baby pumpkins are too cute!
 And then! I found this website, vistaprint.com and got some free goodies along with my new business cards!!! All I bought were the cards, the sticky notes and stamper were free and I got to design them myself!
 Whew! That's a lot. I'm going to make more pumpkins now and TOMORROW you get to make some too!
Ciao for now!
Thursday, September 27, 2007
Treasure Hunting!

It was filled with a half burnt candle and burnt wax slopped all over. So I heated it up to get the wax off and cleaned that bad boy up! I LOVE MY NEW GLASS CONCH SHELL!
Today stopped at another thrift store before I picked up my Little Mermaid from school. Not much to report but I did get a few linens and a tea towel.
While looking through some eco-friendly articles on Etsy I decided to try living without (well, GREATLY REDUCING) my use of the papertowel and facial tissues. -Until I get a bidet the TP stays!-
Here are my linen finds for today.

Tonight I might decorate them a bit and show you the results manana!
Save the Earth!
Wednesday, September 26, 2007
First Blog!!!

- knit - really. I can knit and purl but a scarf is as complex as I've ever gotten.
- crochet
- basket weave
- focus on anything but the tv during a Steelers game
- build a space rocket
So that's a little about me and why I'm blogging. Later Gators!


