But, first things first!
HOW TO MAKE YOUR OWN FABRIC PUMPKIN!!!

- Fabric (any type will do - but not felt)
- Embroidery Needle
- Sheers
- Pen
- Embroidery Floss
- Batting/ Stuffing
- Felt
- Something round (Plate, bowl, etc...)

Place your round object on your fabric
Trace & Cut

Thread your needle with a long length of embroidery floss.
Fold over the raw edge of your circle &
sew and running stitch all the way around your fabric circle edge.

Pull the thread ends together slightly to gather the circle edges up forming a bowl.

Stuff with batting. Use more for a firmer pumpkin, less for a squishy pillow.

Pull the threads taut & tie closed securing with a double knot.

Thread your needle with a REALLY LONG length of embroidery floss (at least 3 feet)
Knot the end of your floss and thread needle through puckered opening.
Push all the way through pumpkin to the center bottom.
Pull thread all they way through.
Pull thread around pumpkin, over the top and back around to the bottom.

Push needle through bottom to top opening.

Keep feeding needle from bottom to top creating the pumpkin segments.

You will make 8 segments in your pumpkin.
 Pull thread through top opening and tie off thread by securing to fabric edge and knotting off.
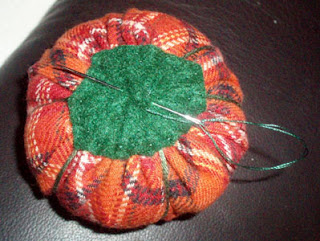
 Cut a piece of felt large enough to fully cover puckered opening.

The felt should be larger than the puckered opening
and when secured, felt to the fabric,
you will want to have loose "extra" felt in the middle for the stem.
 Knot off your thread but don't cut it yet.
Instead, thread needle under felt towards middle of felt top.
You will need to repeat this about 5-6 times to get a nice little stem.

Vintage glass ornaments! Woo-hoo!
'tis the season at the thrift stores!!!
Ciao for now!


